My First Java Environment
How to Set Up a Java Environment in Six Easy Steps
Written by: Larry Coffey

Who is this written for?
It is expected that you have at least some technical background, with at least a remedial understanding of web pages, the Internet, and your operating system (i.e. Windows). For example, I will assume that you know how to copy files from one folder to another. However, if you don't know the difference between a file extension and a hair extension, perhaps this isn't the appropriate tutorial for you.
Also, this is directed at Windows users, though the concepts discussed here hold for most other operating systems, including Linux or Macintosh.
If your computer is capable of running Windows XP, Windows Vista, or Windows 7, you should have no problems setting up a Java development environment. You'll need to have reasonable enough space on your hard drive for tools, say about half a gigabyte or so, but that's about it. Naturally, the faster the computer, the better, but Java is designed to run on many different platforms, including the slower ones.
Still with me? Excellent. Let's get your Java development set up.
Table of Contents
- Introduction - What is Java
- Step 1 - Installing the Java Runtime Environment (JRE)
- Step 2 - Installing the Java Development Kit (JDK)
- Step 3 - Installing the Java Documentation
- Step 4 - Installing a Text Editor
- Step 5 - Installing the Integrated Development Environment (IDE)
- Step 6 - Testing the Setup
- Links - For Further Study
- Definitions - Useful Terms Related To This Tutorial
Introduction - What is Java
Java is a platform-independent programming language released by Sun Microsystems in 1995. It is an extremely robust, general purpose, object-oriented language that can and has been used to create a wide range of applications. With it, a programmer can create web applets, windowing applications, games, or full-blown enterprise solutions. You can find out more about Java here: What is Java?
Enough about what it can do... Let's take that first step in setting up your development environment!
Step 1 - Installing the Java Runtime Environment
Before starting on any Java development, it is essential that your machine already have the most current Java Runtime Environment installed. Note that the Java Runtime Environment is sometimes called the JRE for short. Under Microsoft Windows, Internet Explorer and most other browsers require a third-party plugin to execute Java. If you're not sure if your browser is Java-enabled, try this quick test: Java Runtime Test.
The latest version of the JRE is available from Oracle/Sun Microsystems at: Java Runtime Environment. You'll need to install this before going any further.
Once it's installed, try the Java Runtime Test again to verify your browser is Java enabled.
Step 2 - Installing the Java Development Kit (JDK)
Downloading
Now it's time to get to the real, hard-core stuff. There are many versions of the JDK to download (and usually several bundling options), so you'll have to choose the one that best suits the types of applications you'll be developing. Since we're focusing on applets, we should get the Java SE Development Kit.
Disclaimer: Please note that version numbers and web pages are at the discretion of Oracle/Sun and therefore are subject to change without notice.
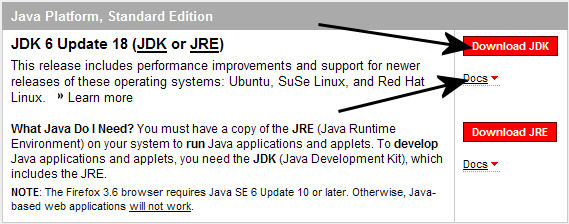
The JDK you need to download can be found on this page: Java SE Downloads. Look for the latest release of the "Java SE Development Kit (JDK)". It's usually a standalone item, not a bundle. Click the "Download Java Platform" button and save it to your hard drive.
Note: we'll come back and grab the docs later.
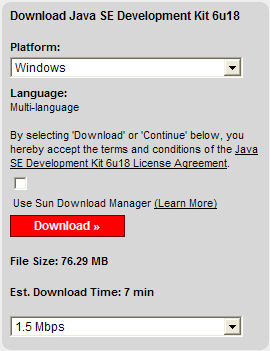
When the new page loads, ensure that Windows is the selected platform before pressing Download.
If it's not Windows, change the platform by clicking on the dropdown box under Platform under "Download Java SE Development Kit" and select Windows from the listbox.
Note that older versions required you to check a box to accept the license agreement terms and conditions, but that seems to have morphed into an implicit agreement now when you click Download.
Next, if you have not logged in using a Sun Online Account, a popup appears to allow you to enter your name and password. While membership can certainly be beneficial, it is not necessary for this download, so just click on Skip this Step to continue.
The download should begin immediately; if it doesn't start, you may have to right click on the filename (e.g. jdk-6u18-windows-i586.exe) and save it to your local hard drive. Depending on your browser, the menu that pops up may say "Save target as.." or "Save Link...". Choose one of those to save the file.
Remember where you save it, because you'll have to find it later to run it! Note that if you have a slow connection (i.e. modem), then you should consider using the Sun Download Manager in case you get disconnected during the download. Otherwise, using a broadband connection which downloads in less than ten minutes, it's probably not necessary.

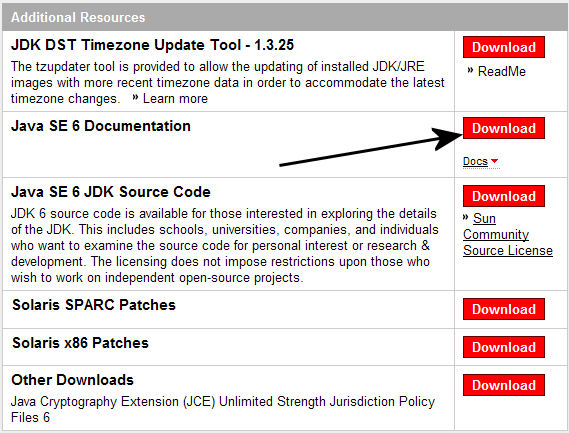
Once the download starts, hit the BACK button a couple times until you return to the original download page. Just under the download button is a "Docs" link. Click that to download the Java SE Documentation. It's convenient to grab it now, because you're there already, but I'll explain installing it in the next section.
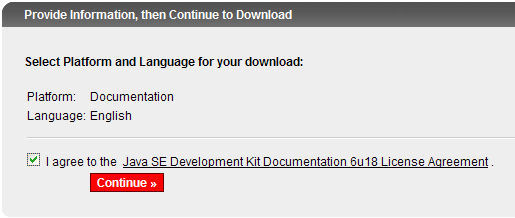
Select the language ("English" would probably be a good choice) and check your agreement with the license agreement before pressing "Continue".
Next you right click on the filename (in the example it's jdk-6u18-docs.zip) and save it to your local hard drive. Note that if you have a slow connection, then you should probably use the Sun Download Manager.

Installation
So far, so good? You should have two downloaded files now. One is the executable used to install for the JDK (e.g. jdk-6u18-windows-i586.exe) and one is the zipped documentation (e.g. jdk-6u18-docs.zip). We'll concentrate on the JDK installation, and save the documentation installation for the next section. The first thing you need to do is to find and open the folder that you've downloaded the files into.
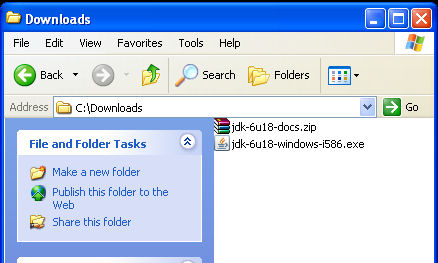
Double click the executable file to begin the installation of the Java Development Kit. It will do some housekeeping, then present you with the the license agreement. Accept it to continue (declining it will end the installation).
Next it'll give you the option of what you want installed, just accept the defaults, which should be "install everything", by clicking Next. It will then install the JDK onto your system into a folder like C:\Program Files\Java\jdk1.6.0_18.
When the JDK has been installed, it will attempt to install the latest version of the Java Runtime Environment (JRE). Allow it to do that by clicking Next again. Note that if any browsers are open, it will ask you to close them. You may wish to bookmark this page before closing your browser so you can resume after installation is complete. Follow all instructions to the end.
Once it successfully installs, it may ask you to register. That's the next section...
Registration
Oracle/Sun will prompt you to register the JDK with your Sun Online Account. Membership and registration is purely optional. I won't suggest whether it would be or would not be beneficial to you, the developer, but here's the blurb from their web site:
After you register your Java Development Kit (JDK), you will receive these benefits:
- Notification of new versions, patches, and updates
- Special offers on Sun developer products, services and training
- Access to early releases and documentation
- Ability to track and manage your registered products and systems on the Sun Inventory site
Setting the PATH Environment Variable
One last manual step, and it's an important one! Failure to do this may result in your tools not running: set the environment path to include the JDK binaries.
If you took the defaults during installation, the JDK installed itself into your Program Files directory, in a subdirectory of Java, and furthermore into a subdirectory that reflects the version of the JDK. You should open up a window (e.g. double click "My Computer") and verify where it installed. It should be something like jdk1.6.0_18\bin under the \Program Files\Java directory.
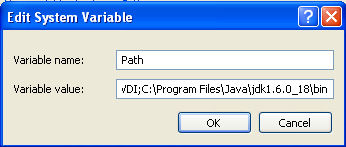
So... What PATH to set depends on the version you've downloaded, and where the JDK installed to. You will need to append the \bin subdirectory name to the installation directory name before adding it into your system path environment variable. Using the version in this example, and taking the default installation path, I added C:\Program Files\Java\jdk1.6.0_18\bin to the end of my environment path. Your JDK path should be similar.
Warning: Be very careful. You are editting a system value that the operating system and some application programs use to find themselves and the location of their resources on your machine. I'm not liable for your typos!
Setting the Path
- Right click the "My Computer" icon
- Choose "Properties" from the popup menu
- Click the "Advanced" tab
- Click on the Environment Variables button
- Under System Variables, find PATH and double click it
- In the Edit System Variable dialog box, go to the text box labeled Variable value:
- Scroll to the end of the text (hitting the <End> key will do that)
- Insert a semicolon (';') and then the full path name of the JDK binaries directory (e.g. C:\Program Files\Java\jdk1.6.0_18\bin)
- Click OK to close the window(s)
If you need more information on how to set your environment path, go here: How do I set or change the PATH system variable?
We'll know soon enough if it's set correctly -- when we test the installation at the very end after everything is installed!
Now that the JDK software is installed, let's go ahead and install the documentation...
Step 3 - Installing the Java Documentation
Installation
This section will explain how to install the Java documentation that you downloaded with the Java Development Kit in the previous section. It's pretty straightforward, but it's a manual installation.
Find the ZIP file you downloaded earlier (e.g. jdk-6u18-docs.zip). It's compressed, so you'll need to use WinZip, WinRAR, or whatever you use to read compressed files to open up the file. Double click on it to open it and you'll find a doc folder inside.
You'll need to copy that folder over to where the JDK was installed. Since the Java Development Kit installs into a version specific directory, you'll have to copy the documentation into the appropriate folder. Note that this is only an issue if you have previous versions of the JDK installed. For example, if you took the defaults, the folder you are looking for is something like C:\Program Files\Java\jdk1.6.0_18.
Simply extract the doc folder from the ZIP file into the JDK folder, so that there is a doc folder in the JDK directory (e.g. C:\Program Files\Java\jdk1.6.0_18\doc), and the documentation is installed.
Step 4 - Installing a Text Editor
Introduction
A text editor is necessary for editing the source code of a program, editing the source of the HTML files necessary to make web pages, and for a myriad of other purposes. Where a word processor is good for creating beautifully formatted text with tables and various fonts, a text editor is used to create the files that can be read by programs that require flat ASCII files, such as compilers, interpreters, and browsers.
Feel free to use your own text editor, just be sure it can save text into a non-document or flat ASCII format. A word processor, like Microsoft Word, is not well-suited to that task because it adds proprietary formatting information to the text. In the next section, I describe installing TextPad, which is a fairly popular and feature packed shareware text editor.
Installation
Open up TextPad.com and click on download. A page is presented with various language options. Choose the appropriate language and method of download (both FTP and HTTP should work with most browsers). Remember where you save the file, because you'll have to find it later to run it! Depending on the language and current version, the file will be called something similar to txpeng531.exe.
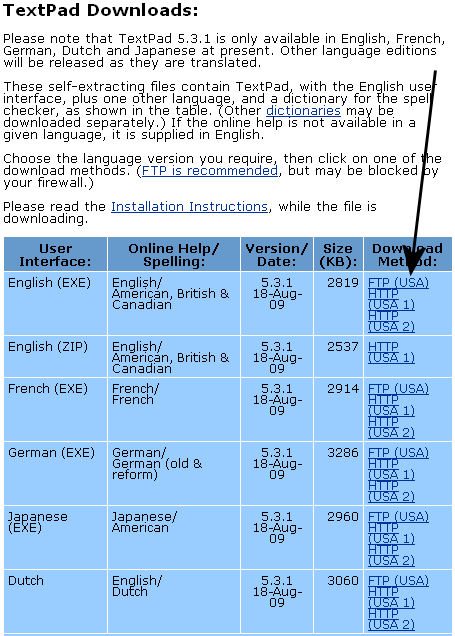
Find the file you just downloaded (e.g. txpeng531.exe) and double click on it to run it. Follow the instructions on screen and TextPad will install itself. I like to associate .txt files with TextPad since it is a better editor than NotePad, but I'll leave that as an exercise for the reader.
Registration
Like any shareware, if you find the software to be useful you have a moral obligation to pay for it. Though it will remain completely functional, after a period of use, TextPad will periodically remind you to register it.
Installing the Integrated Development Environment (IDE)
Download
An Integrated Development Environment (IDE) simplifies the creation of programs by providing most of the programming resources a software developer needs in one neat, little package. One well-known IDE is Microsoft Visual Studio. However, since Microsoft no longer supports Java, that is probably not a really good option for Java development. I recommend using an IDE that you are comfortable with, familiar with, and supports Java editing, compiling, and debugging. One such IDE, is Eclipse, an open source IDE provided by the Eclipse Foundation.
Open up the Eclipse Download page and select the Eclipse IDE for Java Developers package for download.
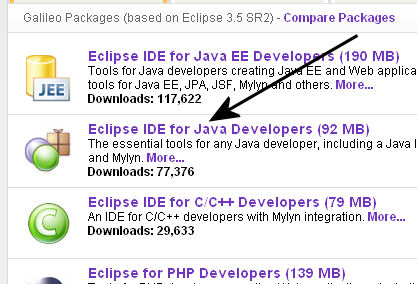
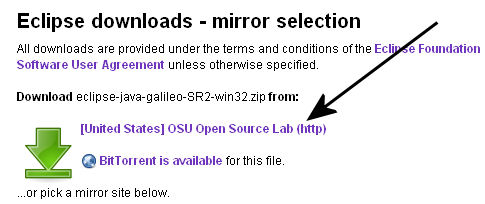
When the download page appears, select the site to download from. Remember where you save the file, because you'll have to find it later to install it! The file will be called something similar to eclipse-java-galileo-SR2-win32.zip.
Installation
Find the ZIP file you downloaded earlier (e.g. eclipse-java-galileo-SR2-win32.zip). It's compressed, so you'll need to use WinZip, WinRAR, or whatever you use to read compressed files to open up that file. Click on it to open it and you'll find an eclipse folder inside.
There is no installation program, but the manual install is pretty straightforward. You'll need to extract that folder onto a hard drive. If you use your C: drive for most of the tools, then I recommend that you use that. It takes about 100MB of space, so make sure there is enough room first. Simply drag the eclipse folder into your C:\ folder.
I recommend one final step, just to make things easier later. Create an Eclipse shortcut for the eclipse.exe that's in the C:\eclipse\ folder, and move it to your desktop. To do this, right click on the Eclipse executable, eclipse.exe, and then select Create Shortcut from the popup menu. Drag the newly created shortcut to the desktop, and installation is complete.
IDE Setup
Double click on the Eclipse shortcut icon (if you created one as recommended in the previous section, or double click on the executable directly, otherwise) to start Eclipse. When Eclipse is first run, it needs to know where you want to create your work directory, and will prompts you for workspace folder immediately. This can be changed later, but the default choice is probably good enough - at least to start with.
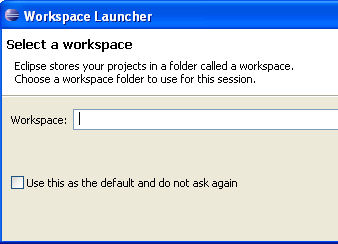
There should be no need to set up Eclipse for Java if you set up the JDK path correctly in the previous section. Eclipse automatically uses the first JDK it finds in the path.
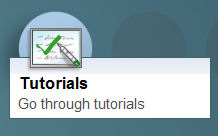
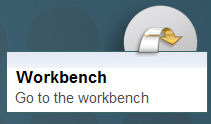
Furthermore, the first time it starts, Eclipse presents a Welcome screen. You'll have several choices in the form of strange icons, but the two most important are the Tutorial and the Workbench. If you wish to learn many of the facets of the IDE, or if you are unfamiliar with IDE's in general, I recommend going through the tutorial.
Step 6 - Testing the Setup
The following sequence can be used to test your setup. I won't attempt to explain the steps along the way, nor will I attempt to debug any problems that occur. It is meant only as a quick yes/no verification that your setup is working.
If you do find you are running into trouble, Eclipse has a good help system. Click on the Help menu, select Help Contents to pull up the help window. Then select Java development user guide. There is an article called Java development overview; clicking Basic tutorial should walk you through the setup in more detail than I have provided here.
Start Eclipse up, and click on the Workbench icon of the Welcome screen.
Click on the File menu, select New, and click on Java Project.
Enter a Project Name of GetVersionApp and then click
the Finish button.
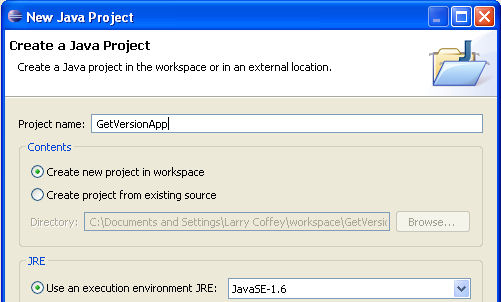
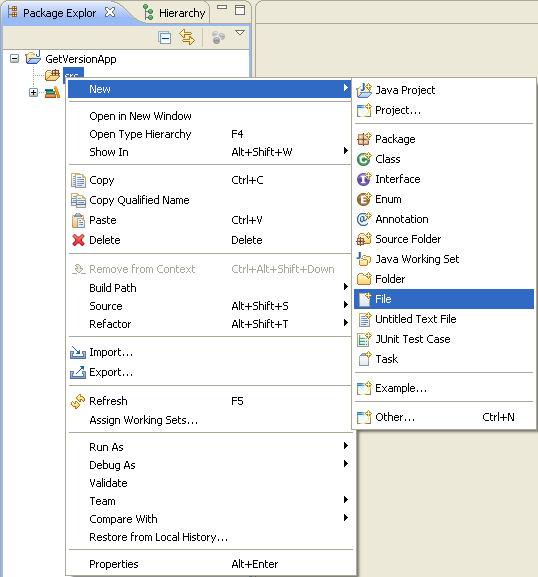
Next, find the GetVersionApp project in the Package Explorer
tab (below the File menu), and click the [+] box to expand the contents
of the list. Right click on the src folder, select New, and click
on File.
Enter a File Name of GetVersionApp.java and click the
Finish button.
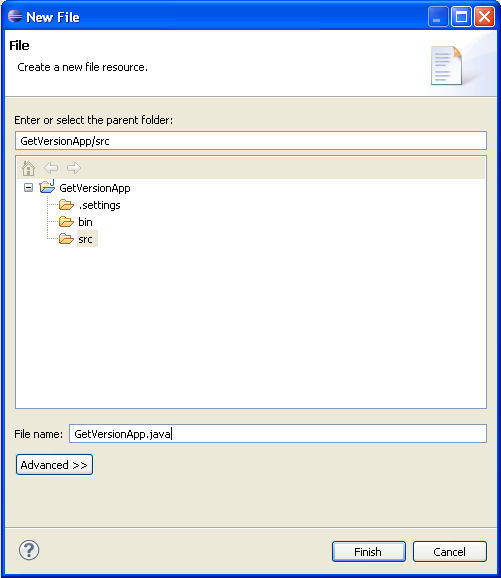
Next enter the following text into the editor:
class GetVersionApp
{
   public static void main (String[] args)
   {
      System.out.println ("This version of Java is: " +
         System.getProperty ("java.version"));
   }
}
Finally, click on the Run menu, and select Run. If prompted, run it as an Application, not an Applet. If you've completed the setup and entered in the above program correctly, then the Console Window should display the version number!

Links - For Further Study
- The Java Language Specification, Third Edition - From the people who invented Java.
- The Java Tutorials - From the people who invented Java
- Java Platform Standard Edition 6 API Specification - Official documentation of the Java libraries
- Java Examples - A wealth of examples, organized by functionality.
- List of Java APIs - Overview of the various available Java libraries.
Definitions - Useful Terms Related To This Tutorial
- Eclipse IDE
- Initially built for Java developers, it is now considered a multi-language software development platform; currently the IDE of choice for many Google Android developers.
- GlassFish
- Application server for the Java EE platform. Typically not used in standard Java application development.
- IDE
- Integrated Development Environment - used as a complete soup-to-nuts development platform that includes editor, compiler, linker (when appropriate), and debugger. Examples of IDE's include Microsoft Visual Studio, NetBeans, and Eclipse.
- Java EE
- Java Platform, Enterprise Edition - used to build Java applications that are typically server based. Additional libraries are provided to create fault-tolerant, distributed applications with modular components.
- Java ME
- Java Platform, Micro Edition - used to build Java applications that are typically executed on mobile phones or set-top boxes.
- Java SE
- Java Platform, Standard Edition - used to build Java applications for general use.
- JavaFX
- Scripting language that executes on top of Java.
- JavaScript
- Interpretted language used in many web browsers, mostly unrelated to the Java language, though it may be used in communicating between Java applets and the web page itself.
- JDK
- Java Development Kit - tools used to build Java applications.
- JRE
- Java Runtime Environment - the interpreter that runs in your browser.
- NetBeans IDE
- Popular IDE for many Java developers.
Photo Credits: Coffee by Scholastica Ees
