From Zero to Applet in 60 Minutes
Written by: Larry Coffey
Who is this written for?
If you've always wanted to know how to write a small program that you could put up on your website, then, with only a little programming experience, this tutorial can help you achieve that goal.
However, it is expected that you have at least some technical background, with at least a remedial understanding of web pages, the Internet, and your operating system (i.e. Windows). Also, some programming background is helpful, perhaps a class in high school or in college, or even just writing small scripts. I won't be teaching you programming concepts here, only what it takes to write a small Java applet and put it onto a web page.
Still with me? Excellent. Let's go build a Java applet! Here are the key points I will cover:
- Section 1: The Java Development Environment
- Section 2: Java Basics
- Section 3: Applet Structure
- Section 4: Compiling The Applet Code
- Section 5: The Web Page
- Section 6: Testing The Applet
- Section 7: The Jar File
- Section 8: Something Useful
- Appendix A: Links - For Further Study
- Appendix B: Definitions - Useful Terms Related To This Tutorial
Section 1: The Java Development Environment
You will need a Java development environment set up on your system to complete this tutorial. If you haven't set one up yet, no worries, simply follow the instructions here: My First Java Environment. I will make use of the tools you installed there: TextPad (text editor) and Eclipse (integrated development environment or "IDE").
If you have your own favorite text editor or integrated development environment (IDE), you can still follow this tutorial as a guideline for what it takes to build a Java applet. While some of the procedures may be different between Eclipse and what you use, the final concepts are the same.
Section 2: Java Basics
Invented in 1991 at Sun Microsystems by a team led by James Gosling, Java has matured over the years, yet retained much of the structural cleanliness that has made it one of the most popular programming languages in recent years. Recently, with Oracle's acquisition of Sun Microsystems, Oracle affirmed its committment to continue support of the language, with the initial focus being on "greater modularity, better support for non-Java languages, and better performance".
Much of the syntax is borrowed from the original "C" language, so if you're already familiar with "C", you'll most likely be able to read a Java program listing. The major difference is that Java was designed from the ground up to be an object oriented language, and, as such, places some restrictions on what can and cannot be done syntactically. Furthermore, while "C" compiles down to a computer's native machine code, for platform portability, Java compiles into a bytecode (also called "P-code") which is then interpretted by the local machine. One other Java feature is the lack of exposed pointers, which causes some frustration to "C" programmers first learning the Java language.
The famous "Hello World" program, in "C":
#include<stdio.h>
int main (int argc, char **argv)
{
   printf ("Hello, World!");   // Display the string.
   return (0);
}
The famous "Hello World" program, in "Java":
class HelloWorldApp
{
   public static void main (String[] args)
   {
      System.out.println ("Hello, World!");   // Display the string.
   }
}
The following is by no means a comprehensive list, but it does highlight some of the differences between the "C" and Java languages:
| Java | C |
|---|---|
| Runs in secure virtual machine | Exposes access to system-wide resources |
| No pointers for primitive types | Pointers, pass by reference, widely used |
| Immutable strings | Arrays of char |
| Native Unicode support | ASCII char type |
| Classes | Structures |
| Garbage collection | Explicit memory management |
| Uses import statements | Uses include statements |
| No class destructor | C++ defines an optional destructor |
The following compares the primitive data types used by "C" and Java.
Note that C sometimes uses long, short,
signed, and unsigned as prefixes
to standard data types to explicitly define the variable, while,
in Java, all numeric data types are signed:
| Primitive | Java | C |
|---|---|---|
| byte | 8-bit signed value, similar to C's char |
No definition |
| short | 16-bit signed integer | 16-bit integer |
| int | 32-bit signed integer | Implementation dependent, typically 32-bit |
| long | 64-bit signed integer | 64-bit signed integer |
| float | 32-bit IEEE floating point | 32-bit IEEE floating point |
| double | 64-bit IEEE floating point | 64-bit IEEE floating point |
| boolean |
Can be true or false, size dependent on implmentation;
similar to C's bool
|
No definition |
| char | 16-bit Unicode character | 8-bit signed value, similar to Java's byte |
| bool | No definition |
Can be true or false, size dependent on implmentation though
typically the size of an int; similar to Java's
boolean
|
A Java program has one class per module (file), though a class
may contain one or more nested classes. A class is said to be instantiated
when it is bound to an object. For example, when executed,
TextArea ta = new TextArea (); will create the object named
ta, an instantiation of the class TextArea.
Simply defining the variable, TextArea ta;,
does not create an instantiation. An object must be assigned to it before
the variable can be used.
A typical Java source file uses the following physical structure to define a class:
import statements;
class definition
{
   instance variables;
   constructor definition (arguments)
   {
      local variables;
      procedural statements;
   }
   method definition (arguments)
   {
      local variables;
      procedural statements;
   }
   ...
   method definition (arguments)
   {
      local variables;
      procedural statements;
   }
}
Section 3: Applet Structure
Now that the 25 cent tour of the Java language is over, let's concentrate
on what it takes to build a real live Java applet. An applet lives within
a browser's context. All the major browsers work the same: an HTML statement
called Applet defines how the browser finds, makes space for,
and executes the applet code. We'll get into the exact syntax of the HTML
later, as well as the building of the JAR file that the Applet
statement uses. For now, we'll concentrate on building a real simple that
demonstrates the entry points to an applet.
When an browser first loads an applet, it calls the init method
once and only once. The start method is executed whenever the
applet is refreshed. The stop method is called to halt the
execution of the applet, while destroy is called by the
browser to reclaim all resources used by the applet. Below, I present a
complete barebones applet, and though it is completely functional, it
doesn't do anything except take up space.
 1 import	java.applet.Applet;
 2 public class TutorialOne extends Applet
 3 {
 4    public TutorialOne ()
 5    {
 6       System.out.println ("Tutorial: Constructor");
 7    }
 8    public String getAppletInfo ()
 9    {
10       return ("Written by: *YOUR NAME GOES HERE*");
11    }
12    public void init ()
13    {
14       System.out.println ("Tutorial: init");
15    }
16    public void start ()
17    {
18       System.out.println ("Tutorial: start");
19    }
20    public void stop ()
21    {
22       System.out.println ("Tutorial: stop");
23    }
24    public void destroy ()
25    {
26       System.out.println ("Tutorial: destroy");
27    }
28 }
Let's examine this applet, line by line.
Line 1 - The import declaration is used to reference classes
declared in other packages. In this case, we only need the Applet
class, but later you'll see that the list of import declarations will grow
as you use more of Java's standard package libraries.
Line 2 - The class statement declares the scope and name of
the class, as well as any superclasses or interfaces it uses. Since this
is a top-level class, it must be declared public, and since
we are writing an applet, we need to extend the java.applet.Applet
class. At this time we won't be using any interfaces, but a commonly used
interface for an applet is the Runnable interface.
Line 3 - Curly braces are used to identify a block of programming statements. A class statement, a method declaration, if, while, and for constructs all make use of curly braces to uniquely identify the code associated with those statements. For every open brace, there must be a matching close brace. In this example, the matching close brace is on line 28.
Line 4 - The constructor method takes the same name as class, in this
case, TutorialOne. Note that in Java, there is no explicit
destructor like in C++. While coding an explicit constructor is usually
good programming practice, it is not necessary. If a constructor is not
provided, then the compiler will default to using the no-argument
constructor of the superclass. If no superclass is declared, it will
default to the Object class's constructor.
Line 6 - Procedural code is placed within each class's methods. In this case we just use a print statement to announce the class has been instantialized. When a class is bound to a variable, the object's constructor is called.
Line 8 - The getAppletInfo method returns information
about the applet you write. You should return a String
containing the author, version, and copyright of the applet.
Line 10 - The return statement from getAppletInfo
uses a string literal. Though strings are handled internally very
differently in Java than in "C", you'll notice that the literals look
very similar.
Line 12 - The init method is called by the browser to
inform you that this applet has been loaded into the system. It is
only called once.
Line 16 - The start method is called by the browser to
inform you that this applet should start its execution. If we needed
to start any threads, this is the right place to do it (we'll do that
later).
The Java documentation is a little misleading on when the
start and stop methods are used. Older
browsers would call the stop method only when the browser
switched to another page, and then call only the start
method again should you eventually cycle back to the page with the
applet on it again. This type of behavior caused stability problems
with browsers, so is no longer in modern browsers. They will
call the stop and destroy methods upon
exiting and completetely reload the applet upon a return to the
same webpage, calling the init and start
methods once again. An brief explanation of this behavior is given
in the evaluation section of this
bug recorded in the Java bug database.
Line 20 - The stop method is called by the browser to
inform you that this applet should stop its execution. This method
is always called before the destroy method.
Line 24 - The destroy method is called by the browser to
inform you that this applet is being reclaimed and should free any
resources that it has allocated. This is usually the last method that
an applet will see before the applet terminates.
Section 4: Compiling The Applet Code
Here's where the real fun begins. Now we need to start up the IDE, enter the applet code, and compile it. I'll describe the procedure using the Eclipse IDE here for this tutorial. Go ahead and start up the the Eclipse IDE now, either by double clicking on the Eclipse shortcut or on the eclipse.exe executable itself.
If you use a different IDE, go ahead and enter the code now and compile it into a TutorialOne.class file.
If you use the command line, enter javac -deprecation
TutorialOne.java to create the TutorialOne.class file.
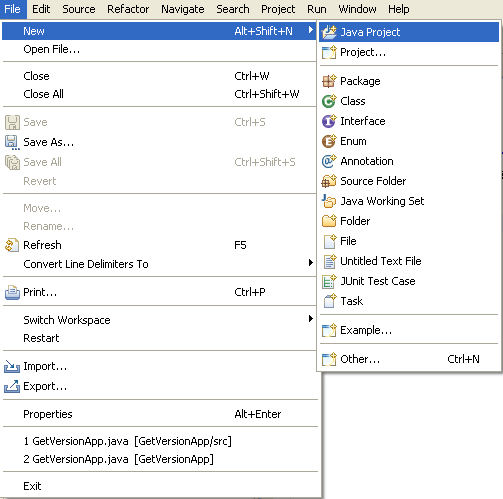
Click on the File menu, select New, and click on Java Project.
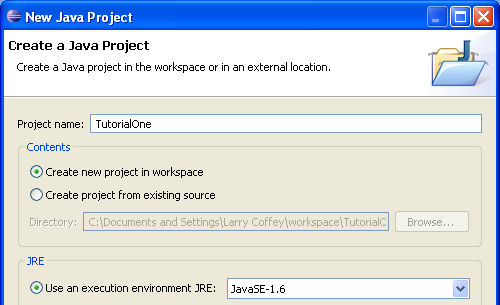
Enter a Project Name of TutorialOne
and then click the Finish button.
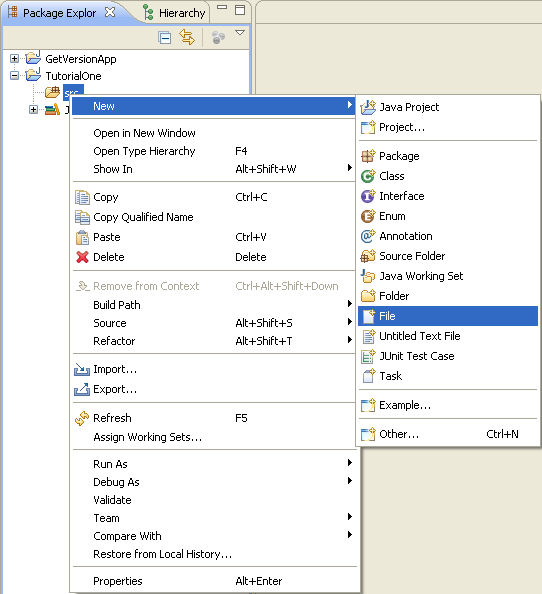
Next, find the TutorialOne project in the Package
Explorer tab (below the File menu), and click the [+] box
to expand the contents of the list. Right click on the src folder,
select New, and click on File.
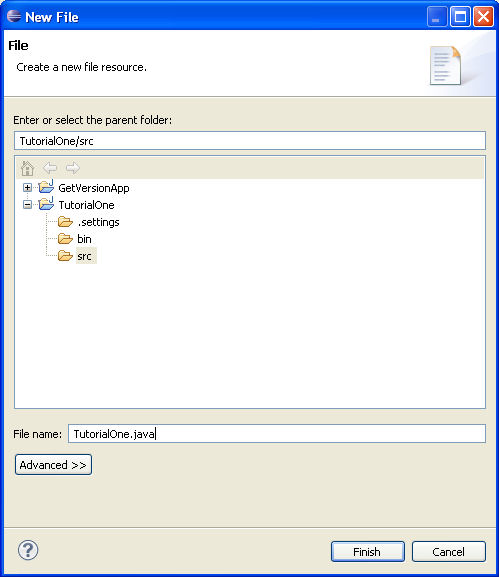
Enter a File Name of TutorialOne.java and click the
Finish button. Please note that the ".java" extension is very
important. If you omit it, the project won't compile correctly.
Copy and paste the TutorialOne source into the editor. Here it is again, without the line numbers:
Finally, from the Run menu, open the Run As submenu and select Java Applet.
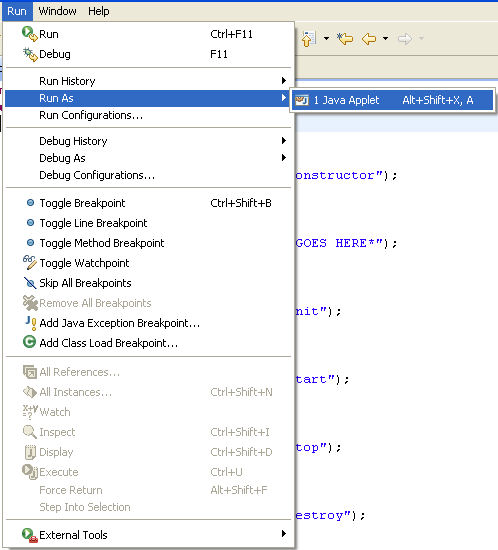
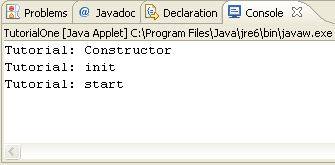
If you have correctly completed the above steps, then an empty Applet Viewer should pop up. Don't worry about it not containing anything, we'll do something useful shortly. However, the Console Window at the bottom of the screen should display some of the print messages we put into the program.
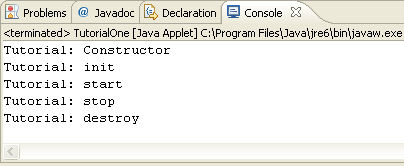
If you close the Applet Viewer, then the applet displays its closing print messages and terminates.
At this point, you have successfully compiled a very basic Java applet. However, you are only half way there, since to create a real applet that others may use, it must run on a webpage not from within development environment's applet viewer. We tackle that problem next.
Section 5: The Web Page
A Java applet lives within the context of a webpage. The key component
for loading a Java applet is the HTML applet tag. Though
the applet tag is officially deprecated, it is the only
tag that runs [relatively] cleanly against the widest range of browsers.
Other alternatives, the object or embed tags
can be used, but have compatibility issues between browser venders and
older browsers. Since the goal of this exercise is to quickly learn how
to write a Java applet, we'll forgo the discussion of browser
compatibility and stick with the deprecated, yet still useful,
applet tag.
The applet tag takes a few parameters that are useful to
us:
- code - Specifies the name of the Java applet
- width - Specifies the width of the applet
- height - Specifies the height of the applet
- archive - Specifies the location of the archive file (See The JAR File below)
Between the <applet> and </applet>
tags, you place any HTML code that would be displayed if the applet
fails to load. This is a good place to inform the user that the browser
needs to be Java-enabled to view the applet.
Using a text editor, like TextPad, copy and paste the following HTML code into a new file, and save it with the name TutorialOne.html:
Section 6: Testing The Applet
Before you run the applet, if you haven't done so already, enable the Java Console so you can see the debugging output. This setting is found in the Windows Control Panel, in the Java Control Panel (Java icon). For more details see: How do I enable and view the Java Console?
The Java Console allows you to see output from the applet's numerous
System.out.println statements. The Java Console starts
up automatically when an applet is executed - when the webpage for
the applet is loaded the first time.
The key to making this work is to place the compiled Java code in the same directory as the HTML file. You will need to copy TutorialOne.class into the same directory as TutorialOne.html.
Compiled Java files have a .class extension. In this particular example, you are looking to grab the TutorialOne.class file. If you used the Eclipse IDE to build your this applet, then the compiled Java code will be found in your Eclipse workspace directory, under the project name's bin directory. For example, if your workspace was off the top level, then the compiled Java file would be C:\workspace\TutorialOne\bin\TutorialOne.class.
Once you have insured that the two files are in the same directory, double click the TutorialOne.html file. Your default browser will launch, displaying the HTML file you just created. The Java Console should also popup, displaying some housekeeping information, followed by the lines:
   Tutorial: Constructor
   Tutorial: init
   Tutorial: start
When you close the webpage, or shut down the browser, two more lines will be displayed briefly before the Java Console eventually closes after a few seconds. Note that the Java Console will remain active and visible as long as a Java applet is running or until you manually close the Java Console. On some browsers, it may remain open for as long as you leave any browser window open.
   Tutorial: stop
   Tutorial: destroy
Note that for some browsers, especially Microsoft Interent Explorer, there may be a minor issue running the applet. Even if you have enabled Java for your browser, if you run this on a local machine, some browsers may restrict Java execution with a message similar to "To help protect your security, Internet Explorer has restricted this webpage from running scripts or ActiveX controls that could access your computer." If you find this to be the case, simply click on the message and select "Allow Blocked Content..." from the popup menu to allow the applet to run.
Section 7: The Jar File
Remember back in Section 2 when I mentioned that
a Java program has one class per file? Well applets would become pretty
unwieldy if they were all written as one monolithic class, not to
mention the violation of every good programming practice on the planet.
But, the applet tag has only one provision for a single
class file. So how do we use multiple classes when only one class
file can be specified?
Enter, the JAR file. A JAR file (or Java ARchive) is a compressed file, like a ZIP, that contains all the compiled modules, and if necessary, the resources (like image files, sounds, etc.) that an applet needs.
Fortunately, Eclipse provides a facility to build JAR files for you. Once you've debugged the applet, using the applet viewer and Eclipse's development facilities, you can easily export a JAR file.
For those that use the command line, running jar cf NAME.jar
*.class in the directory containing the compiled binaries will
build you a simple JAR file. Replace NAME with your archive name.
Okay, so let's build a JAR file from what you've built already. Find
the TutorialOne project in the PackageExplorer tab
(below the File menu). Right click on TutorialOne
to get the pop up menu, and select Export...
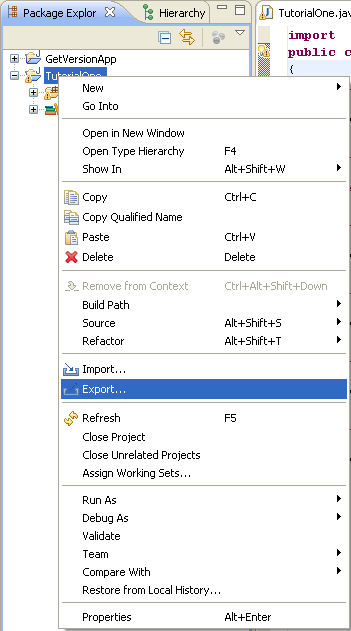
Next, click on the [+] next to Java to expand the tree, select JAR file and then click the Next button.
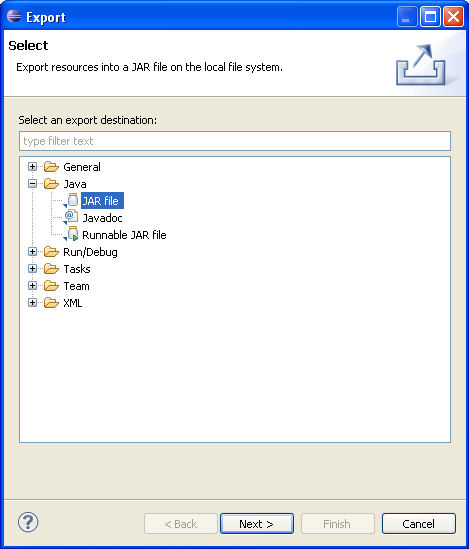
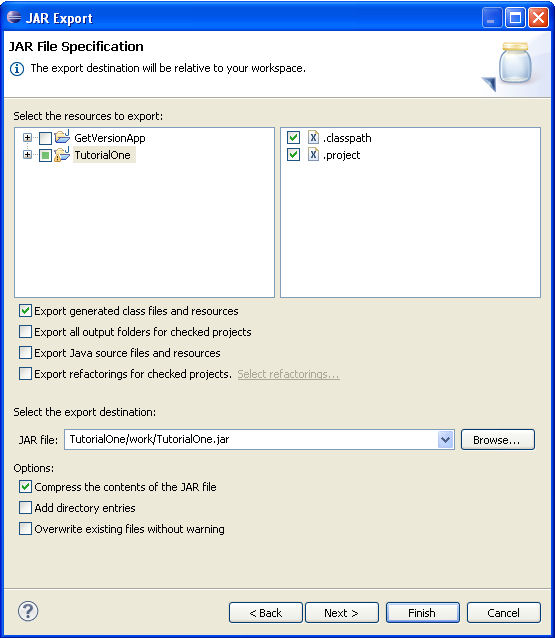
The next step is just telling Eclipse where to put the JAR file it creates. Just put it in the same directory that you have the HTML file already (i.e. the TutorialOne.html file). Click on the Browse button to do this, then enter the name of TutorialOne.jar and click the Finish button.
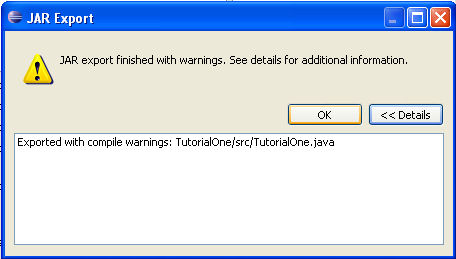
Since there shouldn't be any compiler errors, it should complete properly. However, it may build with one warning. Ignore that for now - we'll get to that later in the next section. Note that the next time you build this, there will be an additional prompt asking if you want to overwrite the existing file (that's a Yes, by the way).
We're almost done. One last thing. Edit the TutorialOne.html
file to change the applet statement to include the JAR
file using the archive parameter:
   <applet code=TutorialOne.class archive=TutorialOne.jar
      width=640 height=480>
And that's all there is to it. Double click on the HTML file, and the applet will launch just like before. If you had previously copied the TutorialOne.class file to your working folder, delete it to verify it is executing from the JAR and not the class file. Of course, the applet doesn't do anything useful yet - I'll show you how to do that in the next section.
Section 8: Something Useful
Build the Applet
Okay, then. Suppose, for an instance, that the ancient Romans had actually discovered electricity and used that knowledge to make something more sophisticated to measure time than a sun dial. Perhaps they would've eventually got around to making digital clocks. Silly? Quite possibly, but it'd certainly make a good Java applet. And it's a lot more fun than printing strings to a debugging console. So, let's make a digital clock, using Roman numerals!
I will quickly touch on some Java concepts that are used in the applet. This is by no means intended to be a comprehensive how to program in Java. I refer you to the online documentation for more details about the classes and methods I use here.
First let us create the new project, compile it, and run it, then I will
briefly explain some of the concepts I use in the program. Like before,
click on the File menu, select New, and click on Java
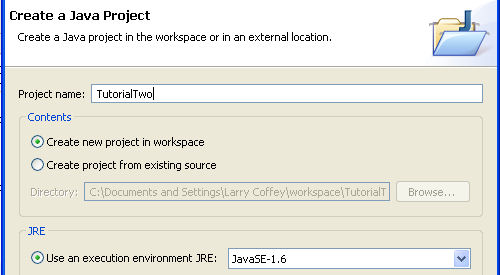
Project. Enter a Project Name of TutorialTwo
and then click the Finish button.
Also, as before, find the TutorialTwo project in the
Package Explorer tab (below the File menu) and click the
[+] box to expand the contents of the list. Right click on
the src folder, select New, and click on File.
Enter a File Name of TutorialTwo.java and click
the Finish button. Don't forget the ".java" extension in the
file name or it won't compile and run!
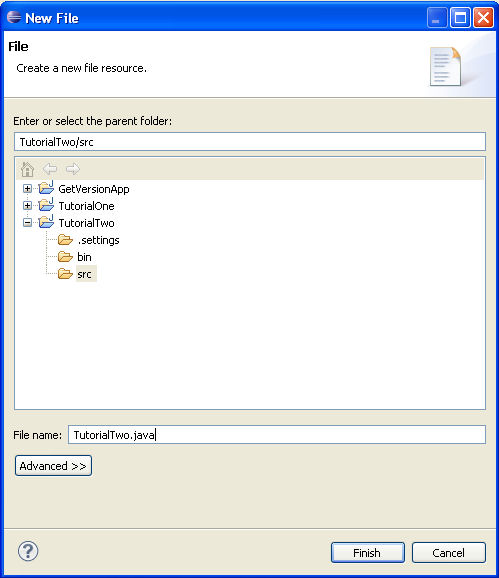
Now, copy and paste the following code into the file, and then save it (don't worry about what it all does at the moment - I'll explain the key points of it later).
The first decision we need to make is to determine the applet size.
There are two reasons for this. The first is obvious: the HTML
applet tag takes a width and height parameter to lay
out the real estate the applet needs on a webpage. The second is
for debugging purposes. The applet viewer in Eclipse needs to be
told how big to be.
Let's set the applet viewer size first, so that we can run it within
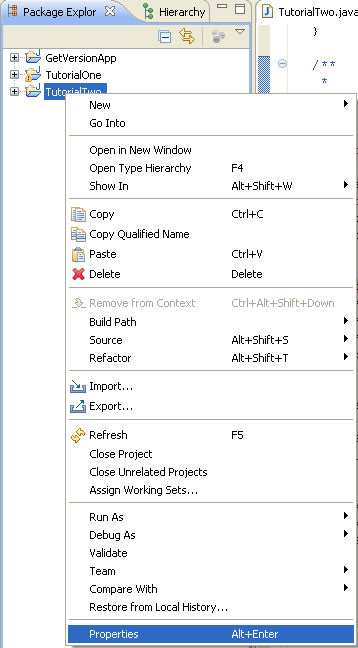
the Eclipse debugging environment. In the Package Explorer,
right click on the TutorialTwo project and select the
Properties item from the popup menu.
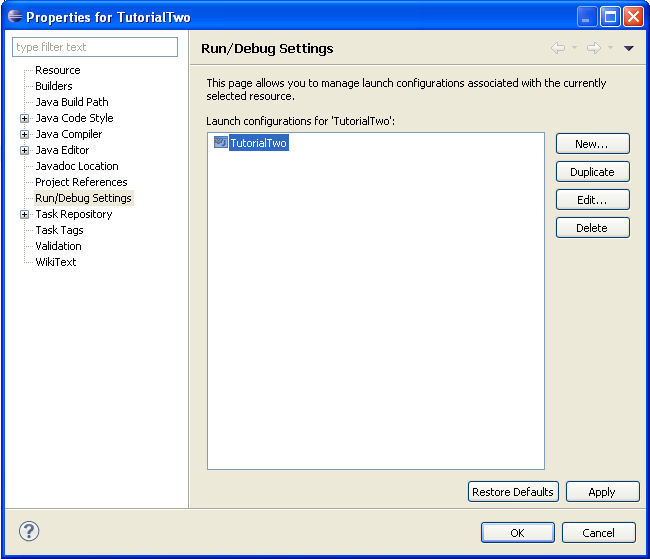
In the Properties for TutorialTwo dialog box, click on the Run/Debug Settings, select TutorialTwo, and then click the Edit button.
In the Edit Configuration dialog box, you'll see several tabs. Select the (x)=Parameters tab, and enter 500 into the Width field and 100 into the Height field. That should be sufficient space to display our Roman digital clock. Through experimentation, you may wish to change these values to suit your own tastes.
Now we are set to run the program in the debugger. Go ahead and run it! Hint: From the Run menu, select Run As, then Java Applet. What you see should be something like this:
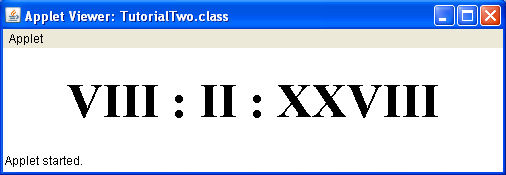
To build a JAR file and run it from within a webpage, follow the same
instructions as for TutorialOne above, except use a filename of
TutorialTwo.jar. Here is the HTML code for the webpage; save it
as TutorialTwo.html in the same folder with the TutorialTwo.jar
file (please note the width and height parameters for the
applet tag):
Once you've built the JAR file and created the HTML file, double click the HTML file to launch the browser. Now you've created a Java applet that can be deployed onto a real web server!
Java Concepts Used in the TutorialTwo Applet
Let me explain some of the key points to the applet we just built. I suggest that you take the time to look at some of the Java documentation for each of these, especially if one or more of the concepts are new to you.
Serialization — Remember that warning we had in TutorialOne?
The one that said we had not defined a static final
serialVersionUID field of type long? Well, we
solve that problem by actually defining a static final
serialVersionUID field of type long on line 22.
Simple, eh? But what is it used for? It is a unique identifier for a
class that can be serialized – and the class Applet
implements the Serializable interface. Serialization is
useful on larger projects where different versions of classes and class
libraries may exist during the life of the software. For such a simple
program as this, serialization is irrelevent, so I use a simple,
default value.
Nested Classes — The class StringIntPair (starting
on line 188) is a very simple nested class, completely subordinate
to the TutorialTwo class. Nested classes do not require a
separate module, being wholly contained within their parent class. I use
StringIntPair very similarly to a "C" struct here, to make
an array named, tableNumerals (line 30), which
contains a paired list of two separate data types, a String
and an int.
The private method toRoman (line 58) makes use of
this array to convert an integer value into a string of Roman numerals.
Note that, like in most programming situations, there are other equally
valid ways to solve this problem. I could've used parallel arrays (one
of type String and one of type int), or I
could've used a doubly subscripted array of type Object.
But if I had done that, I would've passed up a perfect opportunity to
demonstrate nested classes.
Threads — To keep the Java applet updating the screen with the
correct time, we need to create a thread that wakes up every half second
or so and redraws the screen. Java threads are easy to work with. A class
that uses threads needs to implement the Runnable interface
with the class definition (line 19). The class then needs to
include a run method in its definition (line 109).
The thread is actually created in the start method
(line 81) and stored in the member variable, timerThread
(defined on line 26). This variable, timerThread is
used as a signal to terminate the thread when, in the stop
method (line 91), it is set to null (line 94).
The next time the thread wakes up, the run method will
exit when the current thread and timerThread values fail
to match (line 112).
What goes on inside the run method is worth examining. The
exit condition test, mentioned above, allows the applet to exit gracefully.
Within the loop itself, the repaint call (line 114)
forces the applet to redraw itself (an Applet class inherits
this method from the Panel class) which triggers a call to
the overridden paint method (line 125) (also inherited
from the Panel class. After the repaint call,
the thread then goes to sleep for a half-second, using the
Thread.sleep (500); method. Note that this method can
generate an exception that must be handled – I'll discuss
exceptions next.
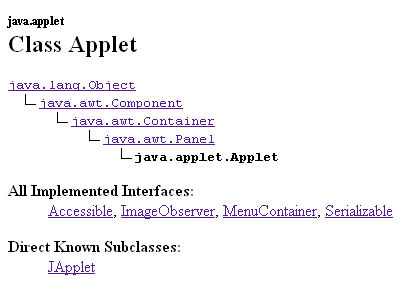
While it is true that Applet inherits from Panel,
Panel in turn inherits from Container, which
itself in turn inherits from the Component class. The
repaint method is technically from the Component
class and this applet's paint method is technically overriding
the paint method from the Container class.
Exceptions — During execution, any program may encounter an abnormal
situation or unexpected event. The Java language handles this by
"throwing" an exception, which may come in one of two ways: checked
or unchecked. Checked exceptions are explicitly required to be handled
by the calling methods. The Thread.sleep method described
above (line 115) is a good example of a checked exception.
An unchecked exception, on the other hand, is one that is not explicitly
required to be caught, but could be generated during program execution
nevertheless. For example, a divide by zero error is a good example of
an unchecked exception. In Java, any subclass of RuntimeException
is considered an unchecked exception.
In either case, the handling is the same: using a try,
catch, finally construct. It works like this:
the code that could generate an exception is placed within the
try block. If and only if an exception occurs, then code
placed within the catch block is executed. Regardless of
which block exited, the try or catch, the
finally block is executed. The finally block
is optional and if it doesn't exist, program execution just falls through
to the next statement following the catch block.
Since Thread.sleep requires handling the
InterruptedException exception, we place the
try block around Thread.sleep (500);
(line 115) and the catch block follows it
(line 116). I don't do anything special to handle the
exception; we simply ask that a stack trace be sent to the console
device (e.printStackTrace ();) so we can debug any problem
should it occur.
There is one case where this exception can occur that is perfectly
legal – when the program is exiting. Under normal circumstances
you probably wouldn't leave the stack trace for this situation in a
deployed program, but - as you've probably seen already - leaving it
in demonstrates how exception handling works. You should see a stack
trace upon exit, because the Thread.sleep (500); method
was interrupted. And that's okay.
GregorianCalendar — At the heart of any program that wants to
display the time, there must be a facility for retrieving the current
date and time from the system. In Java, the easiest way to do this is
with the GregorianCalendar class. Note that while Java
does have a Date class, most of its functionality has
been deprecated.
A GregorianCalendar object is first instantiated (line
133) and then current time is retrieved using the get
method, passing it in sequence, Calendar.SECOND,
Calendar.MINUTE, and Calendar.HOUR
(lines 134-136). We then convert those values to Roman numerals
and construct the string to be displayed (line 137).
Graphics — As with most windowing operating systems, a graphics
context needs to be specified. Java facilitates the maintaining and
rendering a basic graphics state with the Graphics class.
More complex operations can be handled with its subclass,
Graphics2D.
An instantiated Graphics object is passed to us in the
paint method (line 125). You can see we make use
of the Graphics object to set the font (line 140),
to get information about the font (line 141), and to draw
the Roman numerals onto the screen (line 148). The Graphics
and Graphics2D classes are fairly extensive; I highly
recommend you familiarize yourself with these classes if you plan on
doing more complex graphical programming.
Font — Java provides extensive support for maintaining and rendering a wide variety of character representations. A font, at its simplest, is just a description of how to render a character's glyph to the screen. In our case, all we want to do is create a "big" font in which to display Roman numerals.
When the applet is first loaded, the init method is called
(line 71). At this point we create a 48 point font (line 75)
that will be used to render the Roman numerals later. We do this up
front because it's a one time operation that would be time consuming
to do each time in the paint method.
Since we want the Roman numerals to be centered within the applet
window, we need to know how big the string will be when rendered.
Since the string size changes each second, unfortunately, it must
be calculated with in the paint method (line 125).
The first step is to set the graphics context to use the 48 point font (line 140), and then retreive information about the rendered version of that font (line 141). From there we can get the exact width (line 142) and height (line 143) of the string before it's drawn on the screen. Since we already saved the size of the applet window (line 74), it's a simple calculation to center the string.
BUT WAIT... Where would a programming environment be without
its strange quirks? The Graphics.drawString method does not
use the coordinates you pass to it to start drawing the string at the
upper left of the string nor at the lower left of the string or any
seemingly reasonable spot you'd want to start. Instead it is drawn at
the baseline of the leftmost character. Without going
into the hows and whys of it here, to compensate for this weirdness,
we need to add back the distance for the font's baseline to the font
height to give us a usable upper left coordinate of the string. This
is achieved with a call to FontMetrics.getAscent (line
147).
Preparing a Program for JavaDoc — By now you've probably noticed the way the program is documented. Java has a facility for easily producing program documentation from program source code if a few simple rules are followed:
- Comments that begin with /** will show up in the generated Java documentation
- Comments that begin with /* or // will be ignored by JavaDoc
- Certain tags can, and should, be placed within JavaDoc comments using the @ symbol
- The @author tag indicates the programmer of the class
- The @version tag indicates the class version number
- The @param tag indicates the input parameter to a method, followed by the variable name, and a brief description of its usage
- The @return tag indicates the return value from a method, followed by a brief description of its meaning
- Other @ tags exist that may or may not be relevant in documenting your code
Let's go ahead and generate our own documentation right now!
In Eclipse, from the Project menu, select Generate JavaDoc... The first time you run it, you'll have to give it the JavaDoc command. This means you just need to give it the full pathname of the javadoc.exe that was installed along with the JDK. Click on the Configue button and browse to the bin directory of the JDK, then select the javadoc.exe file that is there. This should result in a pathname similar to: C:\Program Files\Java\jdk1.6.0_18\bin\javadoc.exe when you are done (depending on the JDK version you installed).
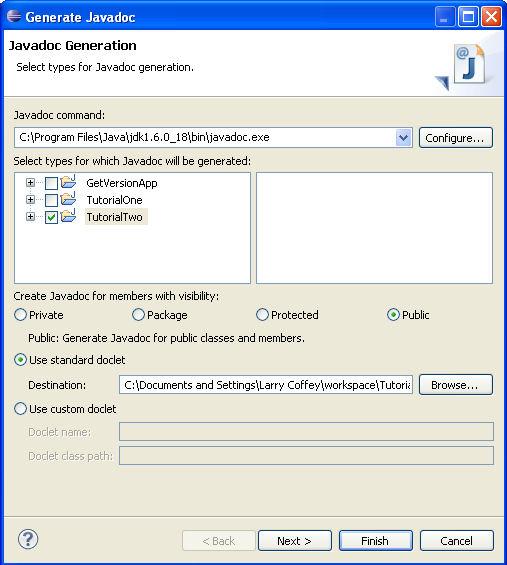
Click the Finish button, confirm you destination directory, and after some crunching, your program is documented in JavaDoc style. Easy, eh? Go take a look at it. It'll be in your workspace directory under the doc subdirectory. To view it, click on the TutorialTwo.html file that it generated. Note that this is a different TutorialTwo.html than the one you built to display the applet in a webpage.
And with that, you have successfully completed this tutorial! You should have enough knowledge now to modify this applet, and study how it works so you can go off and write your own! Have fun!
Suggested Enhancements — Can't get enough of this applet? Here's some fun suggestions that may help you to understand the workings of this applet:
- Novice: Change the background color and the text color of the Roman numerals.
- Novice: Draw a rectangle around the text.
- Novice: Remove the conversion to Roman numerals, but make all digits for seconds and minutes two characters (e.g. Nine o'clock should be "9:00:00", not "9:0:0").
- Journeyman: Make the Roman numeral text blink at a reasonable rate.
- Journeyman: Make the Roman numeral text bounce around the screen.
- Journeyman: Remove the nested class, using a different data structure for the Roman numerals list.
- Expert: Instead of Roman numerals, use words.
- Expert: Create a separate Roman numeral class, in its own module.
- Expert: Optimize the
paintmethod, performing all one time operations during initialization.
Appendix A: Links - For Further Study
- The Java Language Specification, Third Edition - From the people who invented Java.
- The Java Tutorials - From the people who invented Java
- Java Platform Standard Edition 6 API Specification - Official documentation of the Java libraries
- Java Examples - A wealth of examples, organized by functionality.
- List of Java APIs - Overview of the various available Java libraries.
Appendix B: Definitions - Useful Terms Related To This Tutorial
- Eclipse IDE
- Initially built for Java developers, it is now considered a multi-language software development platform; currently the IDE of choice for many Google Android developers.
- GlassFish
- Application server for the Java EE platform. Typically not used in standard Java application development.
- IDE
- Integrated Development Environment - used as a complete soup-to-nuts development platform that includes editor, compiler, linker (when appropriate), and debugger. Examples of IDE's include Microsoft Visual Studio, NetBeans, and Eclipse.
- JAR
- JAR - Java ARchive; a compressed file used to aggregate many files into one related block. Used mainly to distribute Java applications, Java applets, and Java libraries
- Java EE
- Java Platform, Enterprise Edition - used to build Java applications that are typically server based. Additional libraries are provided to create fault-tolerant, distributed applications with modular components.
- Java ME
- Java Platform, Micro Edition - used to build Java applications that are typically executed on mobile phones or set-top boxes.
- Java SE
- Java Platform, Standard Edition - used to build Java applications for general use.
- JavaDoc
- Utility that generates program documentation from Java source code.
- JavaFX
- Scripting language that executes on top of Java.
- JavaScript
- Interpretted language used in many web browsers, mostly unrelated to the Java language, though it may be used in communicating between Java applets and the web page itself.
- JDK
- Java Development Kit - tools used to build Java applications.
- JRE
- Java Runtime Environment - the interpreter that runs in your browser.
- NetBeans IDE
- Popular IDE for many Java developers.
